Wednesday, February 27, 2013

Ma'am, that hood looks...kind of hood.

OMGeezBalls, I ruined the hood of my cozy, puffy winter coat.  I did this by accidentally popping said hood in the dryer.  I always wash the entire coat, then remove hood, and pop the hood less coat into the dryer with 2 tennis balls (thank you J Crew sales associate for letting me know that will keep my puffer looking extra puffy!).  Well on this one occasion, I like many moms I know, I was doing one too many things at the same time and accidentally popped the entire coat, with the faux fur trimmed hood, into the dryer.  45 minutes later, I pulled a road-kill-cafe-blue-plate-special out of the dryer, as the faux fur lived up to it's fauxness and melted and clumped up.  I was a bit distraught, not going to lie.  I kind of thought the poofer would have to go on, sans hood, but I just couldn't accept that fate as reality...so I called on my sewing guru (mother-in-law extraordinaire) and asked her to keep an eye out for faux fur trim, to do a switch out.  I had already searched online, but couldn't find anything...I was just hopeful she would have an idea of where to find some.  Oh boy, did she ever.  She reported that the trim at the fabric shops was 'wimpy' and wouldn't look as fab as the faux fur once did...but she wasn't stopping there.  She started hitting up thrift shops (such a smarty!) and came across a coat with a fur trimmed hood (notice my omission of 'faux'...sorry PETA) and got out thee o' tape measure and it was an exact fit to fix up my puffer.  Hallelujah!

The thrift store was asking $14 for the coat with hood, but since she didn't need the coat, she let them know she would donate it back, and they gave her the fur trimmed hood for $12.  What a steal.  

It's hard to tell in this photo, but the faux fur was pretty lovely!

You can kind of see it's beauty.

 This is what happens when you put faux fur in the dryer.  

 I mean, I could have kept walking around with
this 'thing' on the hood...I did think about it.

What?  Can you stand? If I had known this
drying mishap would have yielded such hood 
treasures, I would have dried it a long time ago!

Enough said.  

I kind of feel like since the fur was thrifted, it was kind of
ethically sourced, on our end.  Right? 


Tuesday, February 26, 2013

Please pray for a miracle...

Please read the following blog posting from our friends in Oregon.  It melts my heart, all while giving me a lump of sadness in my throat.  We are praying like none other that a miracle will meet baby Oliver, and I ask that you please do the same.  Read on: "The time has come,": Valentines:

Sunday, February 24, 2013

Semi-Vintage Necklace

Are you like me, and all about old, gaudy costume jewels???  It's fun to take the vintage jewels and give them new life, by using them in different ways.  That is exactly what I did with this old gold and rhinestone clip-on earring I picked up a few years ago at an estate sale, for pennies.

  The other night I grabbed this necklace (which I do adore) that I 
purchased years ago at Forever 21.  It felt so 'flat' against the
dress I had on (literally, it is flat...as you can see) and I wanted
to give it a bit of dimension, so off I went to rummage through
my costume jewelry treasures.

Dare I say this necklace alone is teetering on 'vintage'...I kid, I kid.

My search concluded, when I spotted this borderline tacky clip-on
earring, and just knew it would do the trick in gussying up my 
cheapy, stock-supplied necklace.

Legit clip-on earring.  Might I add that this is a pretty big chunk
to dangle from an ear...zoinks.

They totally needed to join forces.

Instantly, a custom 'semi-vintage' piece.

What treasures do you have floating around
your jewelry box?


 l

Sunday, February 17, 2013

The BEST Sticky Rolls EVER...Disappearing Rolls


This is a slight variation of the Christmas morning rolls we enjoyed as kids.  My mom called them 'disappearing rolls', because they are so good, they disappear!

Many call something like this monkey bread, but I just call it crazy good!

What you need:
  • 2 loaves of frozen bread dough
  • 10 T. butter, melted
  • 3/4 c. packed brown sugar
  • 1/4 c. honey
  • 1/2 tsp sea salt
  • 1 pkg cook and serve butterscotch pudding (don't make the rookie mistake of trying to substitute instant pudding)
  • 2 T. milk
 Pull 2 loaves of bread dough out of the freezer.  Allow to sit
at room temperature for one hour before cutting into chunks.

In a microwave safe bowl, place butter, honey, sea salt and brown
sugar.  Pop in microwave for 45 seconds.  Stir and continue to 
heat in 30 second intervals until all ingredients are melted and smooth.

This step can also be done in a saucepan...I just find that I am doing this
late at night, for the next morning, and need to speed the process up.

Bread dough cut into chunks and placed in a buttered 9x13 pan.
Allow butter/sugar mixture to cool out of microwave, then add
1 package of cook & serve butterscotch pudding and 2
 tablespoons milk.  Stir until smooth.

This is what the sauce should look like.  Dare you not to take a dip
with your finger.  Seriously, dare you!  

Pour the sauce over the bread dough, cover and place in the 
refrigerator over night. 

Obviously the dough is not going to proof in the refrigerator, over 
night...so unless you set your alarm for 3am to pull them out to 
proof on the counter follow my simple cheater trick for quick 
proofing these ridiculous rolls: pull them out of the refrigerator and
pop in a preheated oven at 170 degrees.  They will proof in no time
(30-45 minutes...depending on your altitude)

This is what they look like at 6000 feet (i.e. my home) after 45 minutes
at 170 degrees.  All ready for the real heat.  I just switch it up to 350 degrees, 
not worrying that the rolls sit in the oven while the temperature rises.

After 20 minutes of baking at 350 degrees, I noticed the tops 
were browning, quicker than I wanted, so I reused the piece
of aluminum foil that I covered them with in the refrigerator overnight
and popped on top, so they could keep baking, but not keep browning.

They cooked for 10 more minutes and were perfection!  

After 30 minutes bake time.  Run and knife or spatula around the
edges of the plan, and flip onto a serving platter (or a half sheet).

Ummm, what!!!  Are you trying to take a nibble of your 
computer screen, or what?  These will please any crowd!

If there are any left over (doubtful), cover and store at room
temperature. 

Saturday, February 9, 2013

Funky Dipped Pretzels...OMGeezy these are Easy!

We all have a friend who pays a cople dollars a pop, for a dipped pretzel rod...
what a rip off!  These tasty treats are so easy to make!  


What you need to create these treats:

2 cups semi-sweet chocolate chips

22 pretzel rods

Then all the goodies you can think up for topping the dripped pretzel rods...there are no limits to the possibilities!  My little sous chef (Logan) and I whipped these up while Zac and our friends from MN are up mountain, skiing for the day.  I just know they will love the Samoa-esque (yes, the Girl Scout cookie) goodies we top the chocolate pretzel rods with.  

 Fill a sauce pan with a couple inches of water,
then place a glass or stainless steel bowl over the sauce pan.
Make sure the bottom of the bowl does not touch the water.

Over medium heat, slowly melt 1 and 1/2 cups semi sweet chocolate chips.

(if you don't have a way of doing this, pop the chips in the
microwave, but be diligent...20 second intervals in the
microwave, and give a stir after each interval.)

Stir often. Be patient. You don't want to rush the
process, or the chocolate will burn.

 Heat until completely smooth.  Remove the
bowl from the sauce pan.

Stir 1/2 cup semi-sweet chocolate chips into the melted 
chocolate.  This will help temper the chocolate (this is not
the proper way to temper, but it works just fine for this treat!).


I placed sweetened coconut flakes in a dry saute pan and toasted
over medium heat, keeping them moving in the pan with a fork.
Keep a watchful eye on the pan as the oils and sugars from the 
coconut will go from toasted to burnt in a jiffy.  

 After I removed the toasted coconut from the pan, I put in some
chopped raw pecans (yes, I recognize these are not in the beloved
cookies, but I think they make for a legit dipped pretzel).  Use
the same technique as for browning the coconut, as the pecans will
also go from lightly toasted to burnt wildly fast!

For the caramely goodness of the Samoa cookie, I decided to use
Heath Bits-o-Brickle (which is just the toffee bits, no chocolate...you 
will find the bag of bits in the same area as chocolate chips at the market)

All the goodies, ready for assembly!

Dip the pretzel, using a spoon to coat and then using the spoon to 
drag off excess chocolate.

If your chocolate starts to set up in the bowl, as you 
are working on dipping the pretzels, pop the bowl
in the microwave for 10 seconds, or pop the bowl 
back on the double boiler to make it smooth again.

Place the dipped pretzel on a Silpat or parchment
lined baking sheet.

Immediately sprinkle with the toppings.

The nice thing about me doing this, and working the 
kinks out before I share with you is that instead of sprinkling,
I ended up placing all the toppings on a plate and rolling the 
chocolate dipped pretzel in the goodies, then placed the 
fully dipped stick on the Silpat to set.  Easy Peasy!!! 

Allow the chocolate to set, and enjoy!

Report back the tasty treats you roll your dipped pretzels in!


Friday, February 1, 2013

Baklava!

OMGeezy, I am about to toot my own horn!  Just be prepared!

A dear friend that Zac and I grew up with was heading out for dinner, and I didn't have a thing to make so I decided I would order in from this amazeballs Greek restaurant across the road.  It is legit...but, I have a hard time having someone over for dinner, that I simply ordered in.  I had to get my dessert baking on!  In my pantry/fridge/freezer search I found fillo dough and instantly felt the need to make baklava!!!  I had never made it, but knew the taste, as I used to open boxes and boxes of frozen baklava when I worked at BoDiddley's back in the day and one time watched a roommate make it in college.  Photographic memory...not going to lie! 

This recipe will make an 8x8 inch pan.  If you do a 9x13 pan, just double the recipe...since this was my first time making it, and I didn't have a recipe, I decided not to commit to the big boy pan!

1 roll of fillo dough.  I pulled it out of the freezer, but kept the roll in 
the plastic and let it come to room temperature.

 Toss 2 cups of raw pecans with 1 tsp cinnamon and place on
a baking sheet and pop in a 300 degree oven for 5 minutes.

Place toasted pecans, 1 T. granulated sugar and
1/4 tsp sea salt in a food professor (if you don't
have a food professor, put in a plastic back and 
run a rolling pin over it to break up into bits)

Pulse until it looks something like this.  

Generously butter the baking dish.

Fillo dough is a major B WORD to work with...work fast.  Typically, 
I use a pastry brush, to brush butter between each thin layer of dough.  
Alas, I couldn't find my pastry brush, so I just threw a couple layers
of dough down (I was in a hurry...we had a play date to get to) and
proceeded to the next step.

I melted 4 T. butter and since I couldn't find a brush, I just drizzled
a little over the third piece of dough, and spread the melted
 butter around with clean fingers.

Top the buttered fillo layers with roughly 1/3
of the pecan mixture.  Then, proceed to layer the fillo
dough, melted butter and pecan mixture 2 more times,
finishing with a top layer of fillo dough, topped with butter.

If you are spreading the melted butter around with your hands, press
the layers down tightly, as you are doing it.  If you are using a pastry
brush to spread the melted butter, press the top layer of fillo down firmly, 
before you brush the final layer of melted butter.

With a sharp knife, cut all the way through each layer.  Decide how big you 
want the pieces, before you start cutting. Double check that you cut all the 
way to the bottom of the pan!!!

Place in a preheated 350 degree oven and bake for 30-35 minutes
 (keep in mind that this time is for a small pan).

While the pastry baked, I combined 4 T. butter, 3/4 cup honey,
1/4 cup water, 1/2 tsp sea salt, 1/4 cup granulated sugar in a sauce
pan and brought to a boil, then reduced to simmer for 5 minutes.

After 5 minutes, I removed from heat and stirred in 1 tsp vanilla.

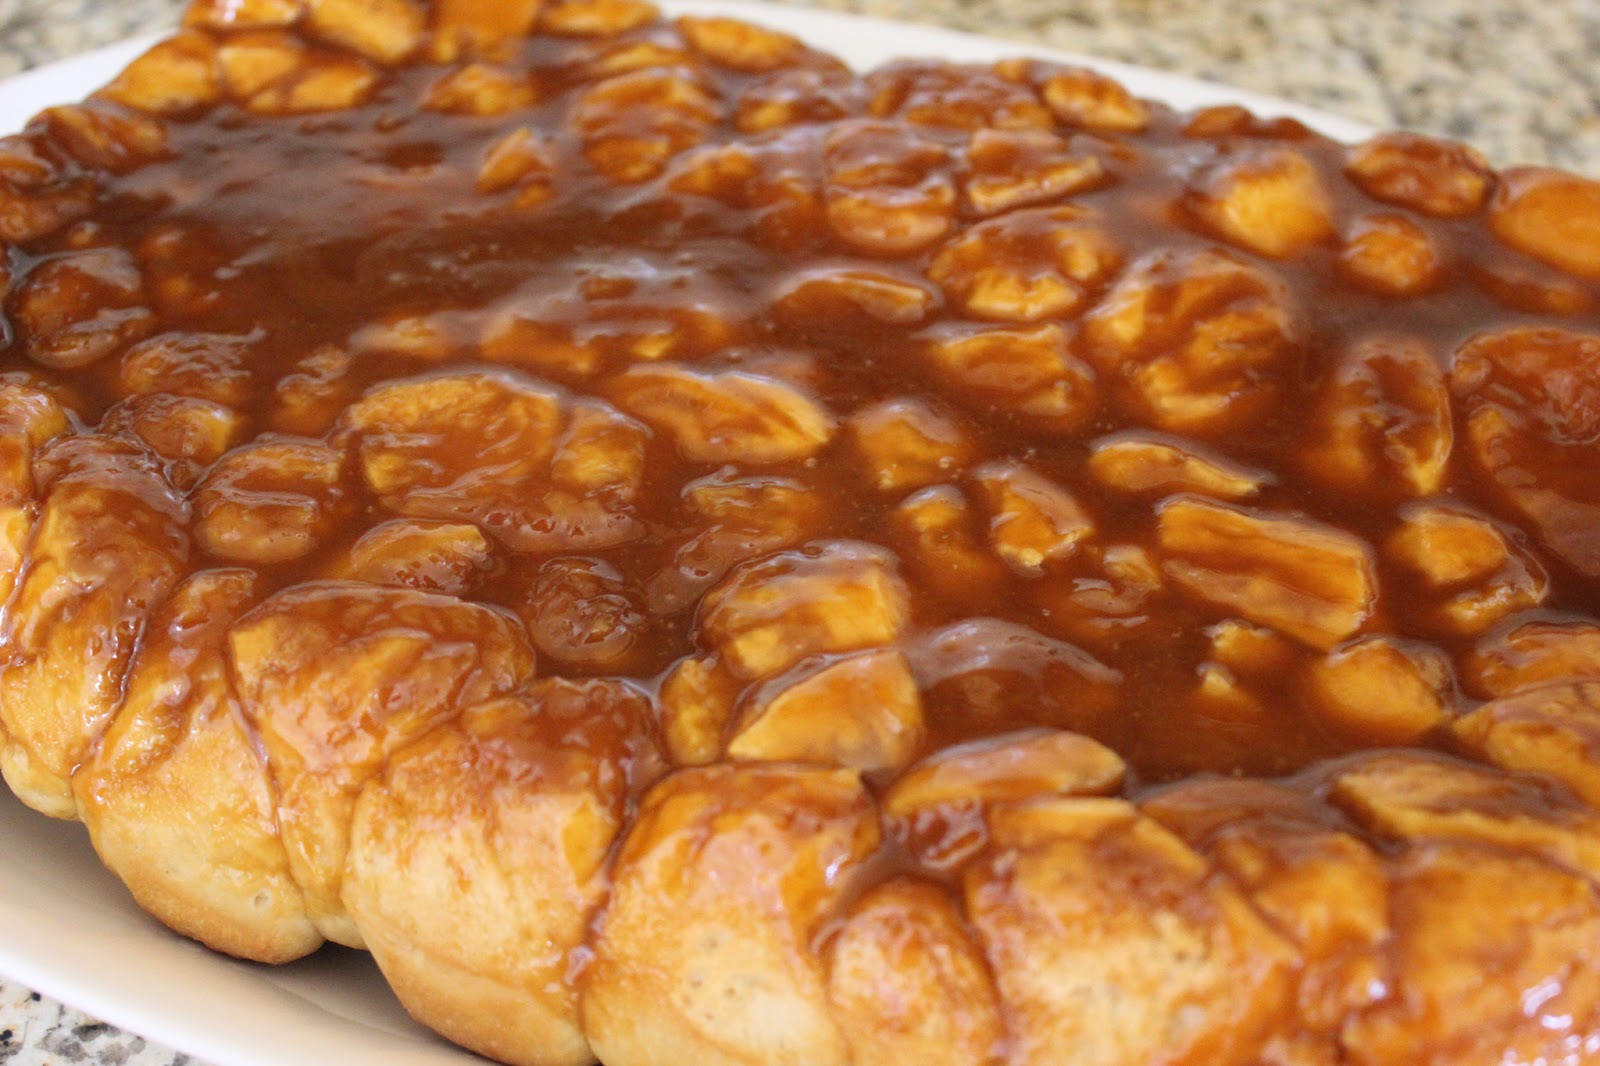
This is what it should look like when you remove from the oven...
The top will be golden brown and crisp.

Immediately pour the sauce over the hot pastry.  The sauce is the sticky
goodness that is loooved about baklava.

Ready to be devoured!  

I might be a little heavy on the pecans in this recipe, and I have learned
that the sea salt is not typical, but it definitely balances the crazy sweet syrup.  
Trust.